Puzzle Cube Project was the first project we did IED. It's a simple project and required less engineering skills compared to other projects we have done this year. Before we started this project, our teacher went over a brief lesson about Autodesk inventor. In the first Autodesk lesson, he taught us how to do simple inventor modeling as well as how to creating drawing sheets. Later, he went over on how to start an assembly and presentation in Inventor. Since this is the very first project, the teacher also went over other basic engineering skills such as how to use a dial caliper, how to use Excel to create Histogram and the rules regarding engineering notebook.
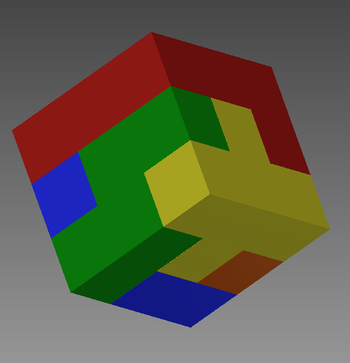
We first need to design a puzzle cube with is made of 5 pieces and each piece have to stay on at least 2 layers in the puzzle. After we came up with a design of the puzzle cube, we then measured each puzzle pieces with clipper to make sure there no puzzle blocks have an unacceptable dimension. A Histogram of puzzle cubes' dimensions are shown below. After that, we drew the multi-views of puzzle cube piece in Engineering notebooks. Next, we modeled each puzzle cube pieces in Autodesk pieces and created drawing sheets for each piece. As soon as we finished that, we assemble all the puzzle cube pieces together using Mate and Flush constraint in Inventor to see if they fits. Finally, we glue the individual small cube blocks to make the 5 puzzle pieces after we colored. Now, a fun and challenging puzzle made of puzzle cubes is created.
We first need to design a puzzle cube with is made of 5 pieces and each piece have to stay on at least 2 layers in the puzzle. After we came up with a design of the puzzle cube, we then measured each puzzle pieces with clipper to make sure there no puzzle blocks have an unacceptable dimension. A Histogram of puzzle cubes' dimensions are shown below. After that, we drew the multi-views of puzzle cube piece in Engineering notebooks. Next, we modeled each puzzle cube pieces in Autodesk pieces and created drawing sheets for each piece. As soon as we finished that, we assemble all the puzzle cube pieces together using Mate and Flush constraint in Inventor to see if they fits. Finally, we glue the individual small cube blocks to make the 5 puzzle pieces after we colored. Now, a fun and challenging puzzle made of puzzle cubes is created.
The Cubes of the Puzzles
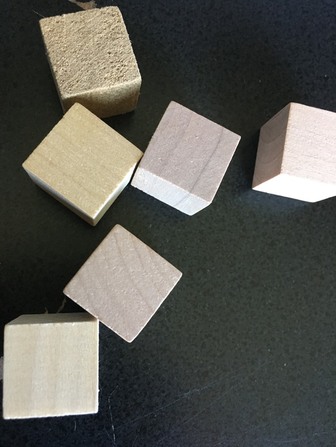
These are the type of cubes needed to for this puzzle cube project. Appropriately 0.75 inches.
|

Although each small cube block look very similar to each other, they actually slightly varies in measurements. This Histogram is designed to represent the frequency distribution of cube blocks' widths in inches.
|
Puzzle Cube Drawing Sheets
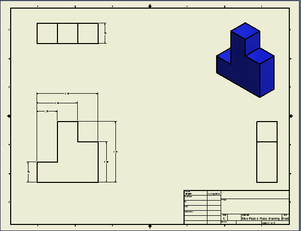
Blue Puzzle Cube Piece
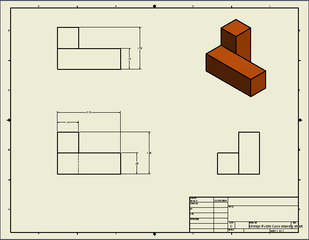
Orange Puzzle Cube Piece |
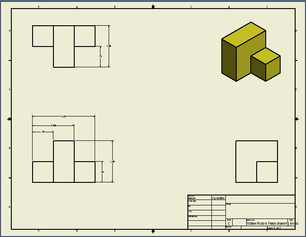
Yellow Puzzle Cube Piece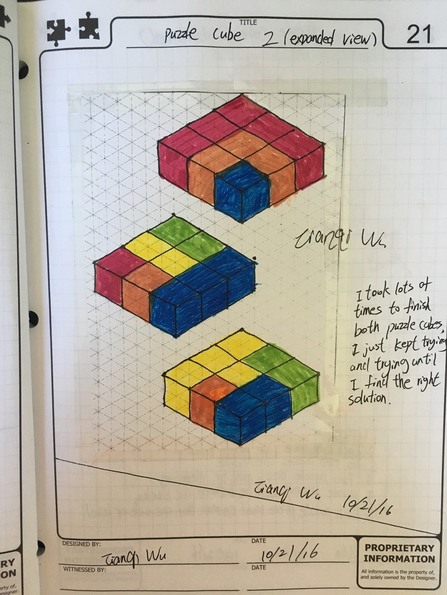
The Sketch of the Puzzle Cube in different layers in engineering Notebook. |
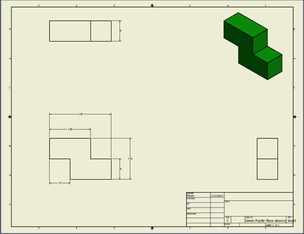
Green Puzzle Cube Piece
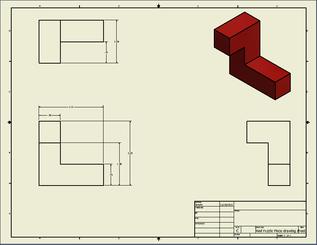
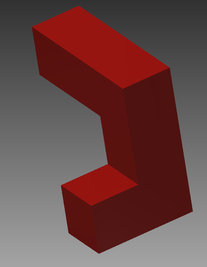
Red Puzzle Cube Piece |
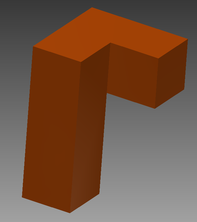
Puzzle Cube Inventor Files
|
|


Puzzle Cube Assembly
|
|
My Assembly Explosion Video
Conclusion |
This is the video form my Exploded Presentation of the puzzle cube Assembly that I recorded, then uploaded into YouTube for Easier View.
|
Looking back on the process of making this puzzle cube, it seems that the process is quite simple. However, there are ton of steps in this project, From designing a puzzle cube, drawing it, assemble it and actually building it can take some time. The most challenging aspect of this project is to come up with a design for those puzzle cube pieces. Our teacher sets strict rules for each cube pieces. For example, 1. Must have five puzzle pieces, 2. No two pieces can be alike, 3. Two puzzle pieces must be interlocking, 4. Puzzle pieces must be between 4-6 blocks 5. Each puzzle piece must on more than one side or level. And the most challenging of all is to make the cube pieces interlock with each other. There are many ways to to design puzzle cube pieces within the 3x3 cube, but there are much less ways to design a good interlocking pieces within the 3x3 cube. It took me a lot of time just to think about the design for the puzzle cube. I just kept trying and trying and only having several different attempts, I eventually came up with this excellent design. This puzzle cube project helped me to understand the brainstorming and the design process for making a successful product. I also knows now that a good solutions come only after several different failures. Moreover, a nice thing about these puzzle cubes is that we can compete with classmates to actually solve these cubes and figure out who got the most complicated design. The best part of this project is that we can enjoy the fun of solving the puzzle cubes while we learn what it takes to be a professional designer.
